Six steps, three deadlines and one claim kit. Here is how a travel insurance claim actually travels, from the moment things go wrong to the money landing in your account.
Buying travel insurance is the easy part. Getting paid is where most travelers get lost. Squaremouth, the US comparison site, says around 20–30% of claims are denied because of simple errors like missing paperwork, not because of what happened on the trip.
The good news: claims get paid all the time. Squaremouth’s claims data shows the average paid claim reached $2,609 in 2024, up 37% on the year before. The travelers who get that money are rarely luckier. They are better organized.
This guide maps a travel insurance claim from start to finish: who to call first, what to collect for each type of claim, the deadlines that close the door, and what to do if the answer is no. If you haven’t bought a policy yet, start with Travel Insurance, Explained Simply and come back here before you fly.
The claim route at a glance
Every travel insurance claim follows the same line, whether it’s a lost bag in Lisbon or a hospital stay in Chiang Mai. Learn the stops once and you’ll know what to do next at every point.
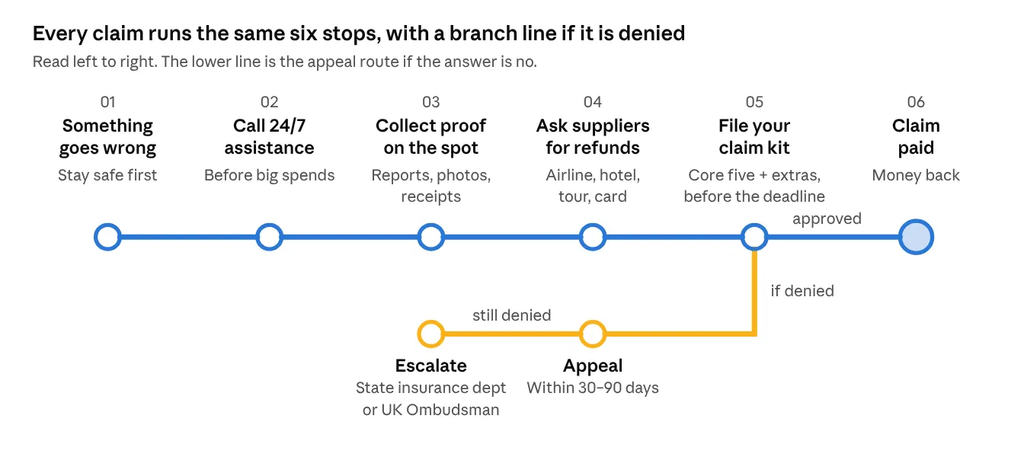
Stops 2 to 4 happen during your trip, which is why the claim is mostly won or lost before you’re home.
Step 1: Call the assistance line before you spend money
The single best thing you can do when something goes wrong is call your insurer’s 24/7 assistance number before you pay for anything big. Assistance teams can find a suitable hospital, arrange payment directly with it, and confirm what’s covered while you can still change course.
This matters most for medical claims. Many policies require pre-approval for hospital admission, surgery or evacuation, and an unapproved helicopter ride is a very expensive surprise. If you can’t call (you’re unconscious, or it’s a true emergency), get treated first and have someone call as soon as possible.
On the ground, start your evidence trail straight away:
- Get it in writing on the spot. A police report for theft, the same day if you can, a Property Irregularity Report at the airline desk before you leave the airport for lost bags, a written delay or cancellation notice from the carrier.
- Photograph everything. Damaged bags, injuries, departure boards, the rental car.
- Keep every receipt. Taxis, meals, toothbrushes, the replacement shirt. Card statements help, but itemized receipts are better.
- Ask the airline, hotel or tour operator for a refund first. Travel insurance reimburses what you couldn’t get back elsewhere, so insurers will want to see that request and its answer.
Map tip: make a cloud folder named after your policy number before you leave. Every photo and PDF goes straight in, and your claim is half-built by the time you’re home.
Step 2: Build your claim kit
Missing or insufficient documentation is the most common reason claims are denied, so the claim kit is where you win or lose. Every claim needs a core set of five documents, then a few extras depending on what happened.
The core five, for every claim:
- A short letter of explanation. Who, what, when, where and why, in plain language. One page is plenty.
- Your original itinerary, with what you paid for each booking.
- Proof of insurance: your certificate and policy number.
- Proof of payment: receipts, invoices or card statements.
- Refund confirmation or denial from every airline, hotel and tour operator you asked.
Then add the extras for your claim type:
| Claim type | Add these to the core five |
|---|---|
| Emergency medical | Treating doctor’s statement, medical records, itemized bills, accident report if injured, any denial from your home health insurer |
| Trip cancellation | Written cancellation confirmation from each supplier, proof of the reason (doctor’s note, employer letter, death certificate) |
| Travel delay or missed connection | Carrier’s written statement of the delay and its cause, new itinerary, receipts for meals, hotel and transport |
| Trip interruption | Proof of the reason you came home early, new flight receipt, unused-portion breakdown |
| Lost or delayed baggage | Airline Property Irregularity Report, proof of ownership (receipts or photos), receipts for essentials, any airline settlement |
| Theft | Local police report, proof of ownership, photos |
| Rental car damage | Rental contract, accident report, repair estimate or invoice, photos with the license plate visible |
Kit list adapted from Squaremouth’s documentation checklist. Your insurer has the final say, so ask them for their own list when you open the claim.
Lost a receipt? Don’t give up. World Nomads, for example, accepts card statements, warranties or a store’s duplicate receipt as proof of purchase. Missing a police or medical report is harder to fix, which is why you get those on the spot.
Step 3: Beat the claim deadlines
Two clocks start the moment something goes wrong, and most travelers only know about one. The first is the notice deadline: a short window to tell your insurer a claim is coming. The second is the proof of loss deadline, when the full kit has to be in.
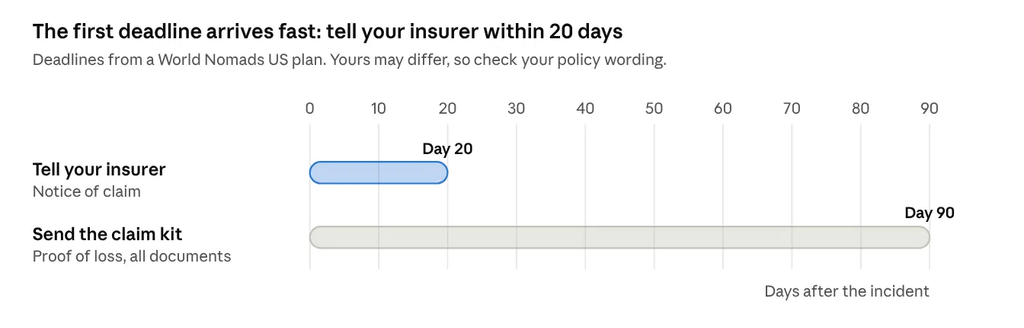
World Nomads’ US plans, for example, ask you to notify them within 20 days and send documents within 90, with extensions of up to 12 months if you call and ask. Other insurers count from the end of your trip rather than the incident, so look up your own numbers the day you buy.
Three habits keep you clear of every clock:
- Notify early, file complete. Send a quick notice the day you’re home, then the full kit once it’s together. Notice costs you nothing and stops the first clock.
- Send it all in one batch. Piecemeal uploads trigger follow-up requests, and each one adds weeks.
- Reply to requests within days. A slow answer to “please send the hospital invoice” is how a strong claim drifts past a deadline.
What travelers claim for, and why claims get denied
Medical bills are now the claim most likely to land on an insurer’s desk. In 2024, emergency medical overtook trip cancellation as the most common paid claim for the first time in more than a decade.
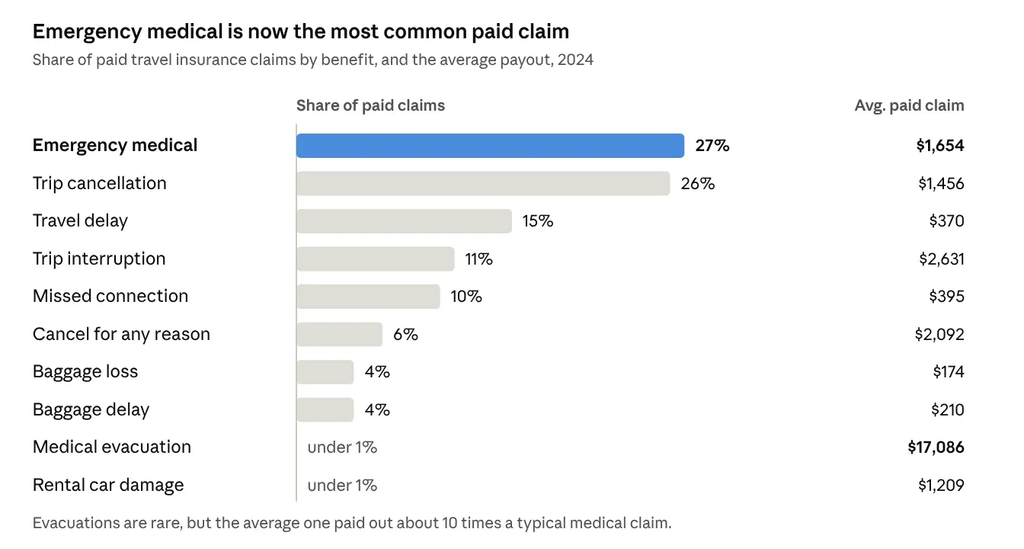
The takeaway for your claim kit: medical and cancellation claims carry the biggest checks and need the most paperwork, so they’re where a missing doctor’s letter hurts most.
Most denials trace back to a short list of avoidable mistakes. Here are the ones Squaremouth sees most often, and the fix for each:
| Why it’s denied | The fix |
|---|---|
| Missing or weak documentation | Send the core five plus your claim-type extras, all at once |
| The event isn’t covered | Read the exclusions before you buy; add sports or CFAR if you need them |
| Filed after the deadline | Notify early; diary the filing date the day you get home |
| A “foreseen” event, such as a storm that was already named | Buy your policy the day you book, before the news breaks |
| Non-emergency or elective treatment | Ask your doctor to state in writing why care was urgent |
| Pre-existing condition | Declare everything, and buy within the waiver window |
If your claim is denied: the appeal route
A denial is not the end of the road. Squaremouth suggests treating it as the start of a negotiation, not a final verdict. Work through these in order:
- Find out exactly why. Call or email and ask for the reason in writing. A “soft” denial usually means they need more information; a “hard” denial needs a formal appeal.
- Check the appeal deadline. Most insurers give you 30, 60 or 90 days to appeal. Miss it and the claim closes for good.
- Fill the gap they named. The most common fix for medical claims is a fresh letter from the treating doctor confirming the treatment was an emergency and unrelated to any pre-existing condition.
- Write a formal appeal. A one-page cover letter that quotes the policy wording you’re relying on, lists every new document attached, and says what you want paid.
- Ask for help. If you bought through a comparison site or broker, ask them to advocate for you. Squaremouth, for one, runs a claims advocacy team for policies sold on its site.
- Escalate to the regulator. This is your last resort, and it’s free.
Where to escalate:
| You live in | Go to | The rule |
|---|---|---|
| United States | Your state’s Department of Insurance | File a complaint with your correspondence attached; travel insurance is regulated state by state |
| United Kingdom | Financial Ombudsman Service | Complain to the insurer first. Once you have its final response, you have 6 months to refer it |
| Elsewhere | Your national insurance ombudsman or regulator | Your policy wording names it in the complaints section |
Keep a log of every call: date, name, what was said. Regulators ask for it, and insurers behave better when they can see you’re keeping one.
Your travel insurance claim checklist
Save this before you fly. Screenshot it, print it, or pin it to your phone’s home screen.
Before you go
- Save the 24/7 assistance number and claims email offline and on paper
- Note your policy’s notice and filing deadlines in your phone calendar
- Create a cloud folder named after your policy number
- Photograph valuables in your bag, with receipts if you have them
When something goes wrong
- Call assistance before any big medical spend
- Get the written report on the spot: police, airline, doctor or carrier
- Photograph the scene, the damage, the departure board
- Keep every receipt, and ask suppliers for a refund first
When you file
- Notify your insurer within the notice window
- Send the core five plus your claim-type extras, in one batch
- Answer follow-up requests the same week
- Diary the appeal deadline the day any denial arrives
Claim like a pro
A travel insurance claim is a route, not a lottery. Call before you spend, collect the paper as it happens, file early, and send everything at once. Do that and you’re claiming like the travelers who actually get paid.
Still choosing a policy? Read Travel Insurance, Explained Simply to see what each part covers. Then plan the rest of the trip with how I plan a trip from scratch and stop leaking cash abroad with a map of every travel money leak.
Want one honest travel guide a week? Subscribe to the TravelSpatial newsletter below. No spam, unsubscribe anytime.
Travel insurance claim FAQ
How long do I have to file a travel insurance claim?
Usually 90 days from the date of the loss for the paperwork, with an earlier notice deadline (often 20–30 days) to tell the insurer something happened. Some insurers count from the end of the trip instead, so check your policy’s claims section.
How long does a travel insurance claim take to pay?
It varies by insurer and claim type. A simple delay claim with every receipt attached can pay in a few weeks; a medical claim that needs hospital records from abroad can take months. Sending a complete kit the first time is the fastest lever you control.
Can I claim from my airline and my insurer?
Yes, but not for the same money twice. Claim from the airline, hotel or card first, then send your insurer proof of what they paid or refused. The insurer covers the gap.
Do I need the original receipts?
Scans and photos are usually fine for an online claim, but keep the originals until the claim is closed. If a receipt is gone, a card statement or warranty can often stand in.
What’s the most common type of claim?
In Squaremouth’s 2024 data, emergency medical overtook trip cancellation for the first time in over a decade, at 27% of paid claims versus 26%.
My claim was denied for missing documents. Can I resubmit?
Often, yes. That’s a “soft” denial. Send the missing documents with a short cover letter quoting your claim number, and do it before the appeal deadline.
Deadlines, documents and appeal rules in this guide reflect published sources as of October 2026 and vary by insurer, plan and country of residence. Always follow your own policy wording. This guide is general information, not insurance, legal or financial advice.
Sources
- Squaremouth: What to do if your travel insurance claim was denied
- Squaremouth: Travel insurance claims documentation checklist
- Squaremouth: Rising travel costs led to a big shift in travel insurance payouts in 2024
- World Nomads: Completing a claim without all documents
- Financial Ombudsman Service: Time limits